
This recipe is based on the famous No-Knead Bread recipe created by Jim Lahey and published in the New York Times. It has been modified slightly to improve the precision of the dough hydration, and to improve the rise. I first discuss how and why this recipe works, but if you are TL;DR, just skip to the section labelled “Timing”
No-knead bread seems impossibly easy. It is just four ingredients, requires very little work, and, as the name suggests, does not require kneading. Bakers who know a few things about flour may wonder how you can make bread without kneading, as handling the dough develops gluten, which traps bubbles released by the yeast and makes the bread rise. In truth, it is water that is responsible for gluten. Two proteins in wheat, glutenin and gliadin, combine in the presence of water and develop into gluten. You can hasten this development by pushing the moistened flour around, but it will also happen all on its own if you give the dough enough time. No-knead bread uses a very small amount of yeast to extend the rising time to many hours. Not only does gluten develop over that long time, but enzymes in the flour activate and convert some of the wheat starches into sugar, which feeds the yeast and adds to the flavour of the bread. If you can wait the 22 hours or so that it takes to make this bread, you will be rewarded by a tasty, crusty, country-style loaf similar to one that you can find in artisanal bakeries.
Normally when I make bread that is kneaded, I start with a bit less flour than the recipe calls for (because usually, “wetter is better”) and then add a bit more only if required to make kneading possible. Because this bread is not kneaded, the amount of flour can’t be adjusted while mixing, and one has to be very accurate when measuring flour and water to get the right proportion. Therefore, I strongly recommend using a scale. All-purpose flour is typically 140 grams per cup, but can vary by 20 grams under or over depending on how you measure, and the difference will change the outcome of the bread. You can get a digital scale at hardware stores for a reasonable price.
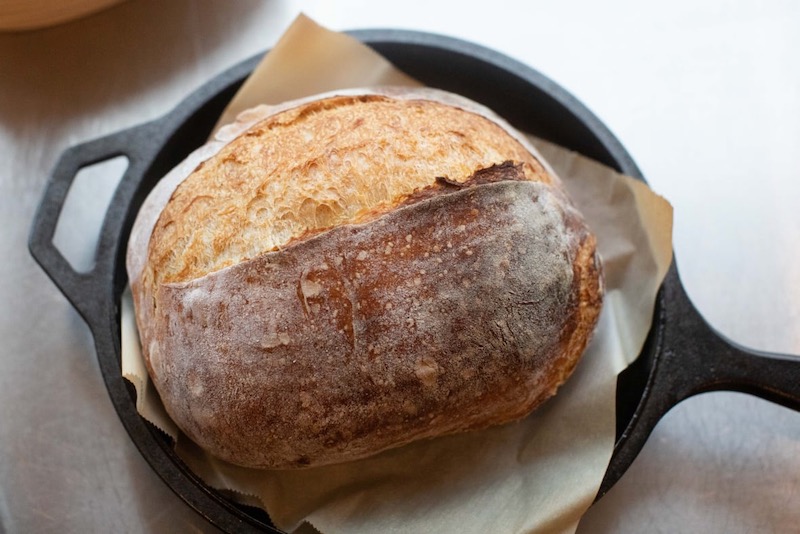
There are many types of flour, and the one you choose will make a difference to the outcome of the bread. If you are lucky enough to have access to Canadian flour, you should make your first loaf with any Canadian brand of all-purpose, unbleached white flour (bread flour is also fine, but not necessary), and then you can try mixing in some whole wheat, multigrain, rye, spelt, or anything you want, next time. (If you can’t get Canadian flour, look for a high-quality “bread” or “strong” flour.) If you substitute more than one third of the white for other flour, the bread will be heavier compared to the one made with pure white flour, but some may prefer it like that. The loaf pictured with this recipe was made with 25% whole wheat flour.
Salt is also something that comes in various types. The amount used in this recipe is too small to measure by weight, so is given in teaspoons. Iodized table salt is quite dense, so is quite salty. Kosher salt, which is more crystalline, is about half as salty at a comparable volume. The amount used depends on the type.
When you buy yeast in the supermarket, you may see several types. There is only one that you should ever buy, and that is what is called “instant yeast” (also known as “fast-rising”). If you can’t get it, you can use “active dry yeast” in a pinch, but it may not rise as high. Be aware that yeast is very sensitive to temperature, and the dough needs to be around normal room temperature for all of its rising time. If you are doing an overnight rise, and your kitchen gets very cool at night (say, below 16ºC), you may need to place the bowl in your bedroom, or find some place that does not cool down so much, such as a water heater closet. Some ovens have a “proofing” setting, but I find that they are often too warm. If you have such an oven, and it can be set to 80ºF or below, that would work well.
If you do some reading about artisanal bread-making, especially sourdough bread, you will find bread recipes written in “bakers’ percentages”. This is a method where the total flour weight is normalized to 100%, and then all other ingredients are expressed as a percentage of the flour. For example, a recipe that asks for 80% water will require 400 grams of water (or 400 millilitres, which is the same, only for water) if the total amount of flour weighs 500 grams. In general, sourdough breads start as very high-hydration doughs, 80% and above. Such a wet dough is tricky to handle, and requires flour of high protein content and quality. This recipe is 75% hydration, for slightly easier handling. But, if you experiment with flour blending, such as adding whole wheat, spelt, einkorn, or rye to the basic white flour, you will change the water absorption and you may want to modify the hydration. For example, rye flour can absorb more water, so you may increase the hydration to 80%. Get out your calculator and make notes as you modify, but only after you have tried the basic recipe first!
The main improvement in this version of the recipe, as compared to the other ones you will find on the Internet, is the insertion of a step used in making sourdough bread. High-hydration dough will develop sticky filaments of gluten over time, but the air-bubble-trapping characteristics of gluten will be improved if you encourage the filaments to stick together into sheets. All you need is to stretch the dough and fold it onto itself. This can be done in the bowl easily, a small number of times while it is sitting on the counter. It will greatly improve the rise and quality of the outcome, and the method is described in the recipe below.
Mixing the ingredients for this bread is the easiest part of the recipe. Putting it into whatever you use to bake it is the hardest part, because of the high hydration. You could even call this recipe impossible-to-knead bread because the dough is so slack. Getting it out of the bowl and into the pot is the trickiest part of this recipe. I describe a couple of alternatives.
This bread is baked in a covered pot or casserole. A cast-iron pot, like those French enamelled Dutch ovens, works well. So does something called a “combo cooker” made by a cast-iron kitchenware manufacturer. If you have a large ceramic casserole with a lid, that will work too. And if you don’t have any of those, a metal pot with a lid and metal handles can work as well. (Just note that the baking vessel used has to be able to withstand very high temperatures.) You will preheat the pot in a very hot oven, and then drop the risen dough into it without deflating it or burning yourself. One way is to do the final rising on a piece of parchment paper in a deep narrow bowl. When ready to bake, you pick up the corners of the parchment and lower it into the pot in one motion. The alternative is to use a banneton, a rattan proofing basket (find them on line or in cooking stores) that is lined with cloth dusted with bran or rice flour. You carefully overturn the proofing basket onto parchment paper and then lower it into the pot. If you have a combo cooker, you can just overturn the basket onto the base and then add the lid.
Timing
Before you start, you need to check the time. This bread nominally requires 18 hours for a first rising, and two hours for the second. Then it needs 45 minutes in the oven. You can start the bread at 2 p.m., let it rise until 8 a.m. the next morning, then shape, rise, and bake at 10 a.m. It will be out of the oven at 10:45 and then you can eat it with a late lunch. You can also make it late at night, say, 10 p.m., and then shape at 4 p.m. the next afternoon. It will be ready at 6:45 p.m. and completely cooled overnight to be ready for breakfast. If you can’t make this timing work for you, the initial rising can be shortened to as little as 12 hours.
Print RecipeIngredients
450 g flour (see notes above for types and blending of flours)
1/4 teaspoon (slightly heaping) instant yeast
2 teaspoons kosher salt, or 1 teaspoon table salt
338 g room-temperature water
Directions
- Set a bowl on a scale and weigh out the flour. Add salt and yeast and whisk to distribute. Add water and mix with a spatula until all flour is moistened. Cover with plastic wrap and set on a counter that will be at room temperature for 16 hours (or whatever time you are allowing). If the bowl is not deep enough to contain the fully risen dough, you can coat the plastic wrap with a bit of oil to keep the top of the dough dome from sticking.
- The next step is done some number of hours later, somewhere between 3 and 10 hours, depending on what is convenient for you. Wet your hand so the dough won’t stick to it, lift the plastic wrap, grab the edge of the dough, stretch it up, and fold it toward the centre. Rotate the bowl one quarter turn and repeat stretch, fold, and rotation three times. Replace the plastic wrap and repeat the entire dough stretching process two more times, spaced half an hour to an hour apart. By the end of this first rising, the dough should be a well-risen puffy dome.
- After 16 hours (or whatever), lightly dust a counter with flour. Dump the dough out of the bowl, coaxing it out with a spatula without disturbing the bubbles too much. Press the dough lightly with your fingers to flatten into a disk. Pick up an edge, lift straight up, and fold toward the centre. Rotate the dough an eighth of a turn, and repeat the lift and fold seven more times to make an even ball of dough. Flip the dough over so the seam is on the bottom and pull the dough ball towards you with flat hands to stretch the top. Rotate the ball a quarter turn and repeat to get a round, tight ball, if you can.
- Place a square of parchment paper over the bowl that you used for proofing the dough. Gently place the ball of dough, stretched top facing up, on the parchment and lower it into the bowl. Cover loosely with the oiled plastic wrap or a kitchen towel that has been dusted with flour. If you are using rising forms, line with a well-floured towel, and flip the ball over so the tight surface is in contact with the towel. Leave to rise for two hours.
- Half an hour before baking, place a cast-iron dutch oven with its lid into an oven set to 475ºF in the convection mode if it has it. If no convection mode, set the rack so the pot is in the top half of the oven. (Many ovens with no convection mode are notoriously inaccurate with their temperature, and are usually hotter than they say; you may find that setting the oven to 450ºF next time is hot enough if the bottom crust is too dark.) Let the oven and dutch oven thoroughly preheat for half an hour. Test the dough to make sure it is sufficiently proofed by pressing a wet finger into it. The dent should stay for a few seconds and then slowly spring back. Open the oven and slide the rack out with the pot on it. If your dough is rising in a bowl, pick up the four corners of the parchment, lift it out of the bowl, and set it into the pot in one motion. Try to get the parchment as flat as possible on the base of the pot. If your dough is in a banneton, carefully flip it over onto a piece of parchment paper and proceed as above. Using a very sharp knife, make a 1 cm-deep slash across the top of the dough. Replace the pot lid, push the rack back into the oven, close the door, and bake for 30 minutes. Then remove the lid and bake 15 minutes more, or until the top is nut-brown in colour. Remove the bread from the pot and leave on a rack to cool completely before slicing.
4 Comments
Julie
May 9, 2020 at 3:01 amhi Andrei,
Well, you mentioned you were experimenting with ways to give slow-rise high-hydration bread a bit of sourdough OOMPH, and this looks like it! I make mine every other day, so tomorrow night I will try yours. I just lift the risen dough a few times with a bench scraper and plop it into the parchment bowl, but if your method of lifting, rotating, and folding may be better. Other tips: the usual slow-rise is cold water; a fast-rise of 3 hours (same ingredients) is hot water at 52 C or 125-130 F. Same half hour or so proofing after that. For the covered bake, I am settling on 35 minutes, not 30. I use cheap earthenware heavy casseroles with lids from Chinatown (they don’t crack because you put them in the oven cold to start). cheer from Mayne Island
Julie
May 9, 2020 at 3:08 amP.S. Just noticed your salt. I find Baking Shows and judges have a very high requirement for salt, and often suggest things are UNDERsalted. I disagree, and not just for health reasons. If using cups, I use 1/2 tsp. of salt per 3 cups flour. Then just before baking, sprinkle top with good salt, so you get that salty taste when you bite through the great crust.
Julie
May 10, 2020 at 9:59 pmresults! A delicious loaf of bread. I used about 30% Cedar Isle Farm whole wheat flour, 70% white, and 1/2 tsp. salt (with more sprinkled on top before baking).Your extra step of literally stretching the gluten about 10 hours later was interesting. The texture was too silly to lift and stretch over by hand, so I used a silicone spatula. The dough became very buoyant. The final proofed dough seemed quite light, and poufing over top of the parchment, so I forgot to slash it. Ordinarily I use the lowest oven rack, but tried the middle. Baked at 450 for 35 minutes covered + 15 minutes uncovered. Given poufy look, I was surprised that bread had risen just the same as my previous non-stretched. Good things: Excellent crust, more consistently crispy all round. Really nice crumb, with bigger holes (Ignored husband, who said, “I don’t like the holes, it’s not so good for sandwiches.”) Wonderful aroma, of course, and eaten with guacamole on top, and along with cheese. Thank you, Andrei! Baking is extra good during this time. Hoping you are all well.
Andrei
May 12, 2020 at 3:49 amThank you for your feedback on the recipe! I’m amazed at how much the stretch-and-folds make the rising dough poof up so much, as you experienced. Yes, I do get bigger holes when I do that step. Funny how sourdough specialists obsess over holes. I agree that they aren’t good for sandwiches if they are too big! But mine are never so large that the filling falls through (well, not too much). I would recommend that you try the “beginner sourdough” recipe on the site. It makes really wonderful bread, and takes less time than no-knead. You do have to knead it at the beginning, but then it is very similar to no-knead. The flavour is really fantastic, and the texture is wonderful.